Friday, January 27, 2012

The start of an EMPIRE.....or at least so I hope!

Hi Everyone -

Sorry I haven't been posting lately, I've been very busy with tax season (BOOOO!!) and creating my new enterprise...."A Lil' of This & A Lil' of That." I started an etsy shop, created a facebook page and even signed up for twitter (even though I swore off of it, but it's just for the business)!

I also ordered a bunch of stationary items for the business. There's a great website that offers a lot of freebies for stationary type items like business cards, note pads, letterhead, postcards, etc. You should really check it out here! I got business cards, a sign (hopefully for when I do craft shows), Thank You postcards, stickers and a tote bag, most of which was FREE!! I paid a little extra for the business cards because they are color and two sided. Check them out....

Front
Back


I also got little stickers to put on the tops of my canning jars!! I know, I'm getting a little nerdy, but I'm very excited! The blogger of "Frugal Mommy of 2 Girls" is even going to feature the Etsy site on her blog! You can find her blog at http://frugalmommyof2girls.blogspot.com/

She's going to review a pair of earrings, that match the bracelet we made on here, and the corn salsa I just put up on the Etsy site! I'm sending her the package today....


Anyway, please check out the business sites and spread the word to friends and family! I'll get back to DIY blogging soon...wish me luck for tax season!!

Etsy: http://www.etsy.com/shop/sarahcrescitelli
Facebook: https://www.facebook.com/pages/A-Lil-of-This-A-Lil-of-That/169994296438759
Twitter: https://twitter.com/#!/lilthisandthat


Monday, January 9, 2012

Wire Working 101

Okay, so I've been slacking off on my blogging duties lately, but it was the holidays and a lot was going on. Between Christmas shopping, visiting family, New Year Eve and my birthday there was a lot to do. Anyway, back to it....


This is one of my first wire projects! For Christmas my Mom got me a book by Linda Jones, "Making Beautiful Bead & Wire Jewelry" and this is where I got the idea for this project. This book was a great purchase! There are 30 step by step projects and I can't wait to try them all!

Well for this project you'll need the following tools...

  • 20 Gauge Wire (I used navy blue)
  • 26 Gauge wire (I used gold)
  • Wire cutters, round nose pliers and flat nose pliers
  • Jig and 6 pegs

The first step is to setup the jig. A jig is a metal or plastic plate that has a grid of holes and comes with various sized pegs. For this project we're going to need 6 pegs and I used the second to smallest ones that came with my jig. You can use any of the sizes for a different look. Mix and match and see what happens.

Place one peg in any spot. For the next two pegs you're going to skip a row and place the pegs one column to the right and one column to the left of the original peg. Skip another row and put two more pegs in the same columns as the last two. That pattern will be finished with the last peg in the same column as the first and again a skipped row between the last set of pegs.


Next we're going to setup the gold coil for the center of our piece.Cut a piece of the 26 gauge wire about 6 - 8 inches long. Next you're going to take your round nose pliers and wrap the gold wire around the nose of the pliers. You're going to want to keep the wire at the front of the pliers creating a consistently sized coil.


One you've got your coil to about 1/8 of an inch in length cut off the tail end of the wire and form the end of the wire around the nose of the pliers as well. Now onto the main part of our piece, back to the jig...
Cut about an 8 - 12 inch piece of 20 gauge wire, I used navy blue. I start by placing one end of the wire in the hole next to the first (top) peg. This just helps anchor the wire and makes it easier to wrap around the pegs.

Wrap the wire clockwise around the first peg, bringing the wire under the second peg (down and to the left). Next, wrap the wire around the second peg clockwise bringing the wire under the third peg (to the right of the second peg).


Next you are going to wrap the wire CLOCKWISE around the peg to the right. Make sure you pull the wire tight so it's flush against the pegs. Now you're going to thread your pre-made coil onto your wire form. Don't worry if the coil is moving around a little bit.


Once you have the coil on you're going to complete your wire piece by repeating the steps above. Remember to go counter clockwise around the pegs to the left and clockwise around the pegs to the right!


Now that you're done forming your wire piece, gently remove it from the jig. Cut the excess off of both ends and form complete circles with round nose pliers at both the top and bottom.


You can use jump rings to attach multiple pieces together to make a bracelet or attach beads at one end and earring finds to the other for a nice set of earrings! Mix and match colors for different creations!!


Tuesday, November 29, 2011

Monday Mulling Spices

After going to a few wine festivals and craft fairs I decided to make my own mulling spices. Even my Mom who's not normally a red wine drinker liked the mulled red wine. Of course the mulling spices aren't just for us wine drinkers....you can put it in apple cider (rum or whiskey optional), maple syrup or vinegar to make a vinaigrette! It's super easy and inexpensive to make...they were selling each bag at the craft fair for about $3 and I made 8 bags for about $4.

This is what you'll need...

  • Whole Allspice
  • Whole Cloves
  • Whole Nutmeg
  • Whole Cinnamon Sticks
  • Cheese Cloth
  • Cotton String
  • Paper Towels
  • Hammer
The first thing I did was cut all of my cheese cloth. I cut a bunch of roughly 8 inch squares. My cheese cloth wasn't very fine, meaning the spaces between the threads was fairly large so I layered 3 or 4 squares of cheese cloth per mulling bag.


The next thing I did was get all of my spices ready. I took a paper towel and folded it in half twice. I put each spice in between the fold and BAM!! Hit it with a hammer!


I did this with the whole nutmeg, cinnamon sticks and cloves. I just left the allspice whole...

Whole Allspice                             Crushed Nutmeg

Smashed Cinnamon                              Pummeled Cloves

  
After all of the spices were thoroughly smashed, I put a pinch of each and 4-6 cloves (?) of allspice in each of the cheese cloth squares.


After all the spices are placed in the cheese cloth I measured about about 18 inches of cotton string for each bag I was going to make. I doubled each string (end up with 9 inches) and tied it around each square making a closed bag. In order to form the bag, I made an "O" with my hand and slid the square off the counter into my "O".


Once each bag is formed I tied the string around and cut the uneven top off. This made the bags more uniformly shaped. Which, as a high strung accountant, makes me very happy!!


Now for the good part....recipes!!
Spiced Maple Syrup
Simmer 12 oz of maple syrup with one spice bag over low heat for about 5 minutes. Cover and chill for 24 hours or until desired taste is met. Discard spice bag and keep in the fridge for up to two weeks!
Mulled Apple Cider
Combined 1 gallon of apple cider, cranberry juice to taste (optional) and one spice bag. Bring to a boil, reduce heat and let simmer for 30 minutes. Serve warm or chilled.

Spiced Vinaigrette
Simmer 12oz of apple cider vinegar and a spice bag for 1-2 minutes. Remove from heat and let stand for three hours or until desired taste is met. Store for up to two weeks in the refrigerator!

Mulled Red Wine
Combine one bottle of red wine (any type), a spice bag and brown sugar to taste. Simmer on low heat for at least 10 minutes. Serve warm!

If you have any other recipes or ideas for mulling spice bags or uses please leave some comments below!! Happy Mulling!!

~ Sarah

Monday, November 28, 2011

Thanksgiving Madness!

Well I hope you all had a very happy and turkey filled Thanksgiving. I know my family did! We had a smoked turkey which was okay (I personally think it was a little dry) and a spiral ham (one of my favorite holiday meats). I made the mashed potatoes which came out really good. My younger cousins, Colleen and Claire, peeled them all and I mashed them. I added whipping cream and a TON of garlic and butter!

Anyway, for the last few years my Mom and I (along with other various family members depending on who's at our house for Thanksgiving) have been going Black Friday shopping with my good friend Amy and her Mom. This year was no different. One of the best deals I got this year was at Michaels. Everything was 30% off! I got some beads, wire and a bunch of findings...

I know I didn't take how to pictures, but here are some of the items I made over the holiday weekend. Hopefully I'll be able to go back and put up some how to instructions and pictures. For now, here are the finished products!

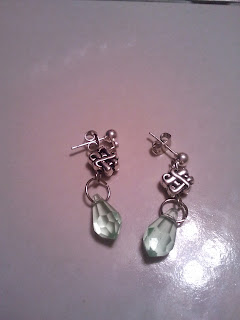
For these I used post findings (which I LOVE), a Celtic silver bead, a loop and a teardrop shaped bead. This are going to be a perfect gift for one of my aunts!


My Mom decided that she was going to take these earrings along with the next set of earrings and necklace. I made these with a single piece of wire, one round bead and two bead stops for each earring. I used a wire jig in order to bend the wire into the shape I wanted.


This is another set that my Mom claimed as hers. She did pick out all of the larger beads, so I guess it's only fair she got the first set. 


My cousin Colleen requested some feather earrings. I originally made her a pair that were just a single feather on a hook style earring back. Afterwards I started playing around with feathers and beads together and got this pair. It took a little bit of Gorilla Glue to get the feather to stay attached to the bead. The bead hole was too large for the bead finding I had so I just put a little drop of glue into the hole to keep the whole thing together. 
 

These are obviously Christmas inspired. I just took a medium sized round red bead and wrapped thin green wire around in a random pattern. This is what I got....which will make another great gift!


 These are similar to the ones above except I used a larger round silver bead and two colors of thin wire (red and green, again for Christmas).


 These were one of my favorites. Simple but I really like them. They are just an oblong bead with a piece of plastic wrapped wire bent around them. Easy to make and the look great!


Here's another pair of feather earrings that I made. Again, it was just a bead, a feather and the pin shaped finding with a flat bottom. This time the bead whole was smaller so no glue was needed.


Like I said, next time I'll put up how to instructions and pictures so you can make your own! It's easy and fairly inexpensive to get started. Anyway, until next time.....

Sarah

Wednesday, November 23, 2011

My first post....wish me luck....

So this is my very first shot at blogging....

I started because of course I was bored at work. I'm using my new favorite site, stumbleupon.com, thanks to my cousin Meaghan and I noticed that a lot of the crafty sites that I'm stumbling upon are personal blogs. Just regular people who like to make things and try DIY projects. That's me! Especially recently! So I decided to write my own blog about the things I make and DIY projects I try. Now for those of you who chose to follow my blog there are a few things you should know....

1. I'm an accountant....therefore I cannot spell or write very well. In fact I tend to write exactly how I speak....
2. Although the purpose of this blog is for crafts, recipes and whatnot I can almost guarantee that there will be posts about my dog, Puckie, and my friends and family's crazy antics.
3. I do tend to use some choice words. I'll try to keep it to a minimum, but sometimes shit is the only way to describe something!

Well I think that's about it for the first one. I guess I really should get back to work or should I say Stumbleupon.com....